
When it comes to maintaining a website, as a matter of fact, adding comments is quite essential. Do you know why? Every website or blog owner has a desire of having high authenticity and good user engagement. Adding (Embedding) comments to the website helps to create your website a good user-engaging environment and increases your reputation as a blogger. Moreover, users love to carry on discussions, express their opinion, or even say "thanks". Comments are the best mode for that. This is a complete tutorial on embedding comments on your website using Hyvor Talk.
So, whether you have mastered coding or not, this article teaches you to add comments to the website without getting stuck. I'm pretty sure that you would definitely find it a piece of cake. Let's begin.
First of all, Why Hyvor Talk?
Hyvor Talk is a privacy-focused commenting plugin that takes care of everything about engaging your users with comments and reactions. You can install Hyvor Talk on your website by just copying and pasting a code (called "embedding a comments section"). With Hyvor Talk, you get a fully-functional moderation panel. And, we handle everything from automated email notifications to advanced spam protection. Moreover, you can completely customize the UI of Hyvor Talk to match your branding.
These are only a few reasons why Hyvor Talk is a great choice for you. For more features and details, you can check out our homepage.
Setting up Hyvor Talk Account
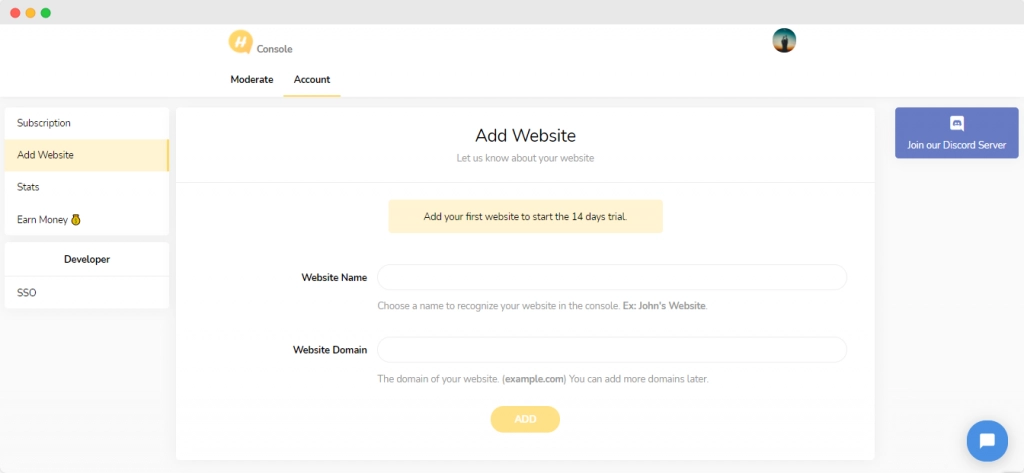
First, you'll need to create a Hyvor account and add your website to the Hyvor Talk console.
Create a Hyvor Account (You'll be automatically redirected to Hyvor Talk Console - https://talk.hyvor.com/console)
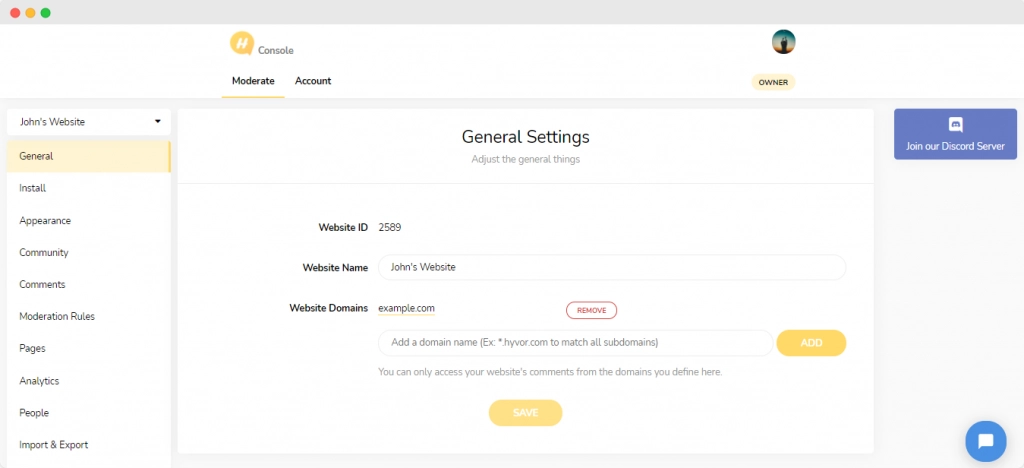
Next, you'll see the console. Add your website details (name and domain) to start.
As I mentioned earlier that this article makes it easier for you to add comments to a website despite your coding ability. There are two main methods to add comments to a website.
Adding (Embedding) Comments to a Website Using HTML Code
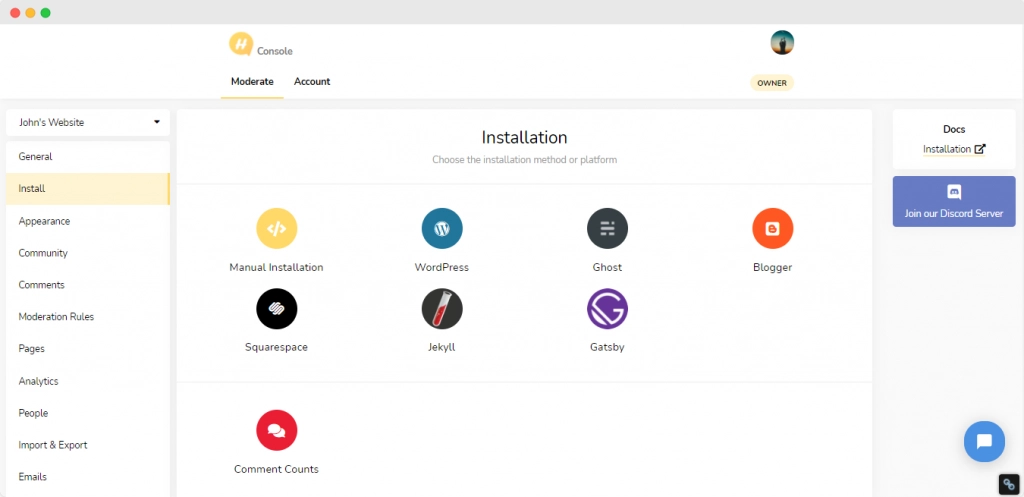
We have native plugins for WordPress and Blogger. If you are using any of those platforms, please jump to the "Installing Comments with Plugins" section below.
Let's see how to install comments on your website with our HTML installation code. This process is not a big deal.
Go to Moderate -> Install in the console, and then you will see different installing options. As we are now going to install Hyvor Talk using the HTML code, you should click on Manual Installation.
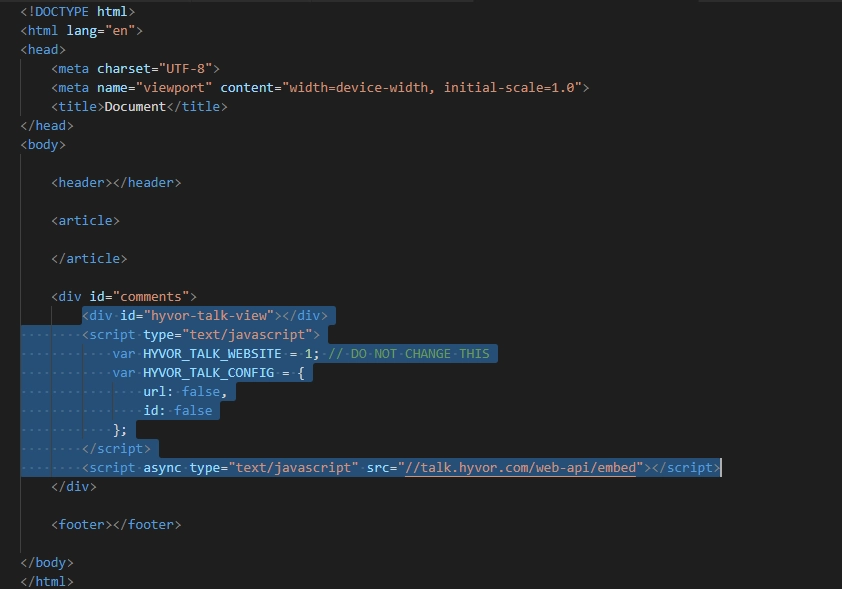
When you click the Manual Installation, you can see the HTML code specially generated by Hyvor Talk for your website. Just copy the given code and paste it on your website's code where you desire to have comments.
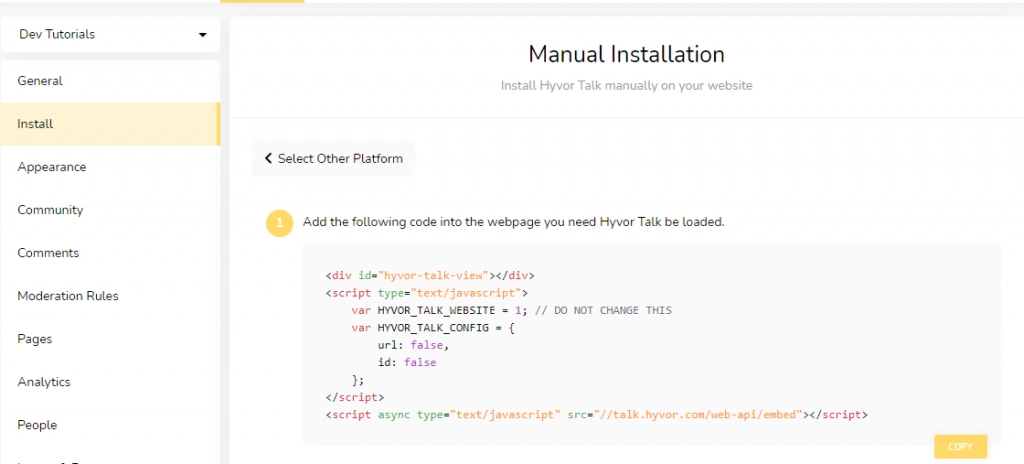
Now, go to your website's source code and paste the code in the place where you need to have comments. For example, the perfect position would be after the article and before the footer, if it's a blog.
That's it! Quite simple, isn't it?
Defining Page IDs (Optional)
By default, we identify pages by the canonical URL of your website (Most new CMSs/blogging platforms set this correctly). If you need, you can manually tell us what identifier to use.
In the installation code, replace the second
false(after id:) with a unique ID for the page. Ex:id:"1125". This makes sure you'll have the comments on the page even if the URL of the page changes.
You can learn more about embed code and configurations from our documentation.
Tip: Whitelisting Multiple Domains & Getting Your Website ID
You can only access the comments from the domains you whitelist in the Moderate -> General section. You can add alternative domains to your website there. You can see your website's ID there too.
Yay! you did it!
Adding Comments to WordPress
Hyvor Talk provides a WordPress plugin to easily embed comments on your WordPress website.
Login to your WordPress admin panel. Then, go to Plugins -> Add New.
Next, type Hyvor Talk in the search bar and find the plugin by Comments by Hyvor Talk.
Then, click Install Now and activate the plugin. After that, go to the Hyvor Talk plugin and add your website ID and click Change.
Simple as I said! You'll see the comments section and comment counts on your website.
Adding Comments to Blogger
Similarly, we provide a blogger widget to easily add comments to Blogger.
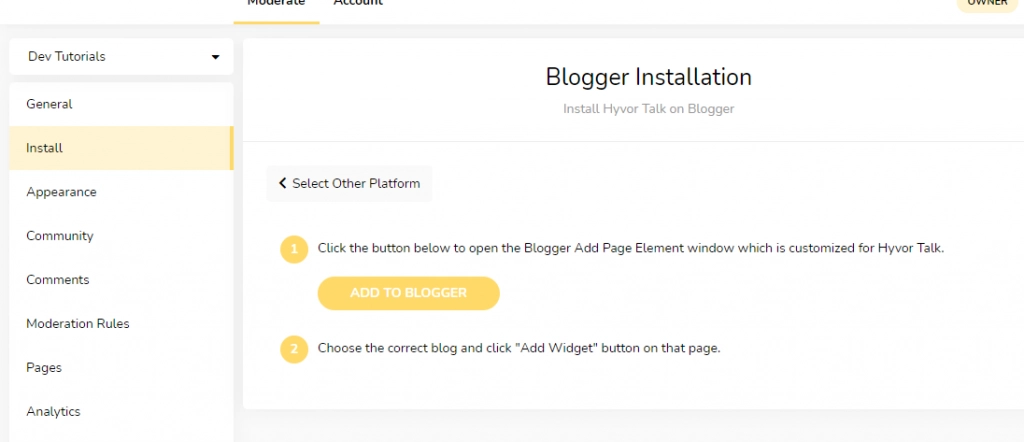
Firstly, go to Hyvor Talk Console. Then, Install -> Blogger. Make sure that you are in the Moderate section.
After that, the console will show you a section named "Blogger Installation". Then, on that section, click Add To Blogger to open the Blogger Add Element page window which is customized by Hyvor Talk.
Lastly, choose the correct blog and click Add Widget on that page. That's it.
Customizing Appearance
After adding comments to the website, it is awesome to customize the appearance appropriately. However, it varies from one to one. But, in this article, you will know how to make changes to the appearance of comments as you wish.
Firstly, go to Console -> Appearance. The appearance section is where you can customize the appearance of comments. Moreover, in the Appearance section, you can see three sections called Color, UI, and Texts. From the Color section, there is a comment section customization.
The color picker makes it easier to deal with colors. In addition, you can see the preview of every change you make simultaneously.
From the UI section, you can customize the following.
Font Family
Box Shadow
Box Roundness
Box Border
Button Roundness
Additionally, you are allowed to add custom CSS as you prefer and the preview of all the changes that you make can be seen too.
From the Texts section, the following changes are allowed.
Comment Box Text
Reply Box Text
No Comments Text
Reaction Text
However, if your are satisfied with the default values of the above sections, click Reset all to default.
Changing Community Settings
This is the place where you can make your community settings as you want. Just visit the Console -> Community. The above video will help you to go through those settings.
Conclusion
In this article, you learned how to embed comments to your website easily with Hyvor Talk. It only takes a few minutes. In addition, you can go through our documentation if you need to learn more about the features of Hyvor Talk and how it works. So, if you have any questions, or suggestions, just comment below.


Comments