
Creating a commenting system from scratch can be time-consuming and expensive. If you want to add commenting functionality to your existing PHP application, you can use Hyvor Talk embedded comments system with Single Sign-on.
In this tutorial, I assume that you already have an authentication system (login/signup) on your application.
So, what's Single Sign-on (SSO)? By default, Hyvor Talk requires users to have a Hyvor account to comment. However, by setting up Single Sign-on, your users can comment using their account on your application.
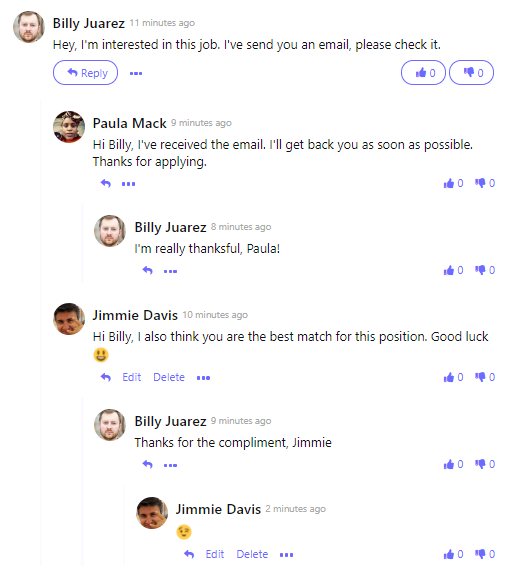
The comments section will look like this:
Setting up Hyvor Talk Account
Before we get started with coding, you'll need to set up Hyvor Talk.
Go to the Hyvor Talk Console. This will ask you to login to your existing Hyvor account or create a new one.
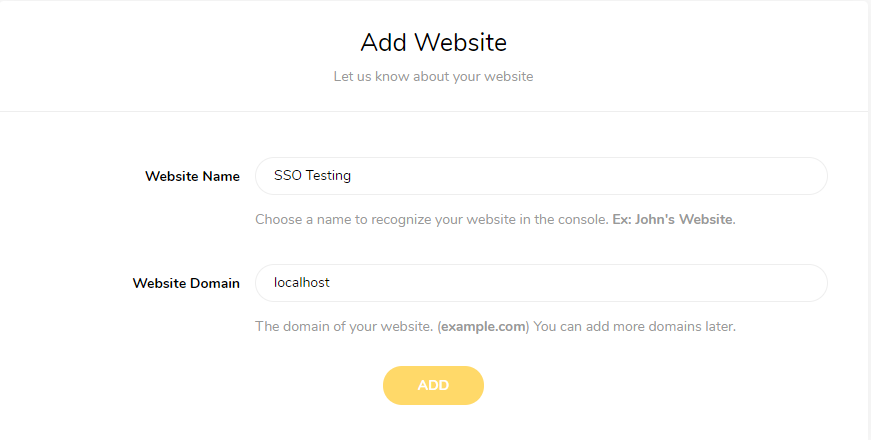
After creating the Hyvor account, add your website to the console.
Then, your 14 days trial will start. You can now start setting up SSO.
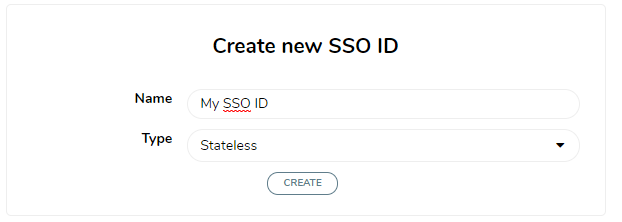
Setting up SSO ID
In Hyvor Talk, a SSO connection is called an "SSO ID". Go to Account -> SSO section in the console, and create a new SSO ID with type "stateless".
Next, click Assign Websites and assign your website to this SSO ID.
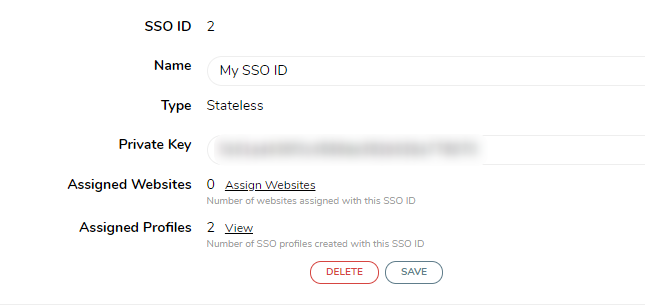
You are all done with setting up Hyvor Talk SSO. Finally, copy your Private Key.
Adding Comments to Your PHP Application
It's time to write some code. Hyvor Talk is an embedded commenting system. It is installed via HTML and JS code. First, get this code from the installation section (Moderate -> Install) of the console.
Copy and paste this code on your template file.
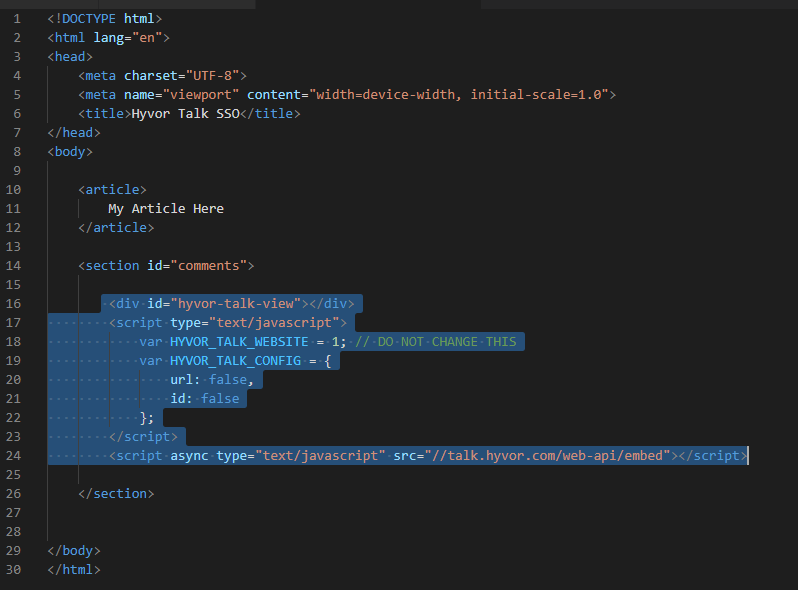
Now, if you check your page, you'll see that the comments section requires Hyvor login to comment.
Connecting Your Accounts System with Hyvor Talk
This is the last step: "Tell Hyvor Talk about the user". In this step, you are going to tell Hyvor Talk whether the user is logged in. If the user is logged in, you'll send their data such as email, name, and profile picture. For security, we hash these data before sending it via the installation code.
Here, I assume that the user data and related methods are stored in an $user object.
1<?php 2$HYVOR_TALK_SSO_PRIVATE_KEY = 'YOUR_PRIVATE_KEY_HERE'; 3$userData = []; // for unauthenticated users 4if ($user -> isLoggedIn()) { 5 $userData = [ 6 'id' => $user -> id, 7 'name' => $user -> name, 8 'email' => $user -> email, 9 'picture' => $user -> picture,10 'url' => $user -> url,11 ];12}13// json and base64 encoding (used for hash and later)14$encodedUserData = base64_encode(json_encode($userData));15// creating the hash16$hash = hash_hmac('sha1', $encodedUserData, $HYVOR_TALK_SSO_PRIVATE_KEY);$user -> isLoggedIn()should be a method on your application to check if the user is logged in.$user -> idshould be unique for each user.
Now, add sso object to HYVOR_TALK_CONFIG in the installation code.
1var HYVOR_TALK_CONFIG = {2 url: false,3 id: false,4 sso: {5 hash: "<?= $hash ?>",6 userData: "<?= $encodedUserData ?>",7 loginURL: "https://yourwebsite.com/login",8 }9}Now, the users will be automatically logged in to the comments section if they are logged into your system. Also, the comments section will show a login button, which will redirect the user to the URL you given by you at HYVOR_TALK_CONFIG.sso.loginURL.
In Conclusion...
That's all you need to get started with Hyvor Talk and Single Sign-on for your PHP application. After this, you can customize the comments section from the console. Visit our documentation to learn more about customization options.
If you have any questions, feel free to comment below.
Resources


Comments