
Ghost is an open-source publishing software written in Node.js. It’s an ideal solution for bloggers who want to have a fully customizable blog under their own domain name.
Ghost is available as a managed service - Ghost(Pro) - where you can have a production-ready Ghost instance deployed and managed by the team at Ghost. However, if you are a more daring tech geek, you can set up Ghost on your own virtual machine from any cloud provider.
In this article, we are going to set up a blog with Ghost in an EC2 instance from AWS.
Prerequisites
1. Create a new EC2 Instance
First of all, if you haven't yet, create an AWS account.
Ghost requires an Ubuntu LTS version later than 16.04. Therefore, we are launching a t2.micro EC2 instance with Ubuntu 20.04.
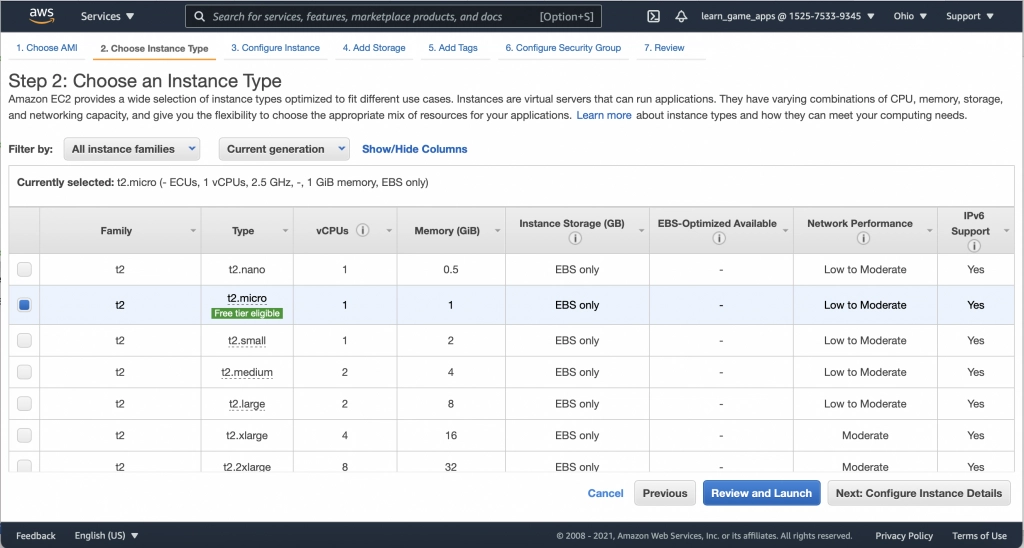
We need a public IP for our EC2 instance for our blog to be accessible from the Internet.
Initially, a 25GB EBS volume would suffice our blog, and we can expand it later whenever required.
2. Register a domain name
We need a domain name to host our new blog. You can buy it from any domain registrar of your preference. After getting the domain name, we must configure the DNS records at the domain registrar with the public IP address assigned to the EC2 instance. This configuration procedure will depend on the registrar, so you must refer to their documentation for it.
If you don't have any experience with buying domains, read this beginner's guide on domain registration.
Setup Ghost
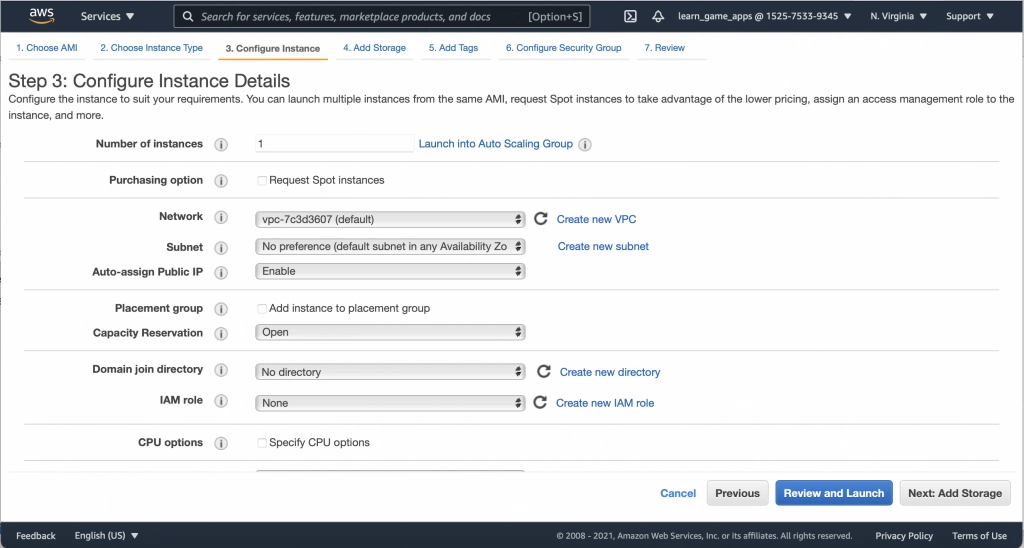
Now, let’s log in to our new EC2 instance and follow the Ghost installation steps. The easiest way to log in is via the EC2 console.
Open the Amazon EC2 console at https://console.aws.amazon.com/ec2/
Choose Instances in the navigation panel
Select the newly created instance and choose Connect.
Verify the user name and choose Connect to open a terminal window.
If you wish to connect in other ways such as SSH, check the official guide here.
Create a Ubuntu User
Create a new user with super-user privileges for running the Ghost server, and change to the newly created user.
1$ sudo adduser ghost_blog 2$ sudo usermod -aG sudo ghost_blog 3$ su - ghost_blogUpdate Ubuntu Packages
Update the package list, and upgrade the installed packages.
1$ sudo apt update 2$ sudo apt upgradeAfter the package upgrade and update are completed, we are ready to install the software components required to run Ghost.
Install NGINX
Ghost depends on the NGINX web server, so let’s install it.
1$ sudo apt install nginx Install MySQL
Install MySQL server, which will be used as the primary data store by Ghost.
1$ sudo apt install mysql-serverThis installs the MySQL server with no passwords. Since Ghost requires a database user account with a password, let’s configure a password for the root user in MySQL.
1$ sudo mysql2mysql> ALTER USER 'root'@'localhost' IDENTIFIED WITH3 mysql_native_password BY 'MyPassword';4mysql> quitInstall Node.js
At the time of this writing, Ghost supports the three latest LTS versions of Node.js. However,
Node12.x is the recommended version according to Ghost documentation.
Ghost requires a system-wide Node.js installation, so we must directly install Node.js without
using any version managers such as NVM.
1$ curl -sL https://deb.nodesource.com/setup_12.x | sudo -E bash2$ sudo apt-get install -y nodejsOnce the installation is complete, check the Node.js version to verify.
1$ node -v2v12.20.1Install Ghost
Now, we are ready to install the Ghost software. First, let’s install Ghost-CLI, which is an NPM package with tools to install and manage Ghost.
1$ sudo npm install ghost-cli@latest -gGhost requires a separate directory, so let’s create that.
1sudo mkdir -p /var/www/cool_blog2sudo chown ghost_blog:ghost_blog /var/www/cool_blog/3$ sudo chmod 755 /var/www/cool_blog4$ cd /var/www/cool_blogNext, start the installation.
1$ ghost installDuring the installation process, the CLI prompts these queries to get inputs for setting up Ghost.
Blog URL
This is the URL of our blog, which we must set according to the domain name we obtained from
the domain registrar. As an example, if your domain is mycoolblog.com, set the URL as https:/
mycoolblog.com.
MySQL Host Name
Since we are installing MySQL and Ghost software on the same virtual machine, we providelocalhost as the MySQL hostname. If we install MySQL on a different server we must input the
hostname or IP address of that server.
MySQL username and password
We provide root as the username, and the password we configured earlier for the root user.
Ghost database name
This would be the production database for Ghost, so enter a sensible name here, and Ghost will
create a new database in MySQL.
Setup Ghost MySQL user
For security reasons, Ghost will not use the root user account for reading and writing to the
database. This step creates a separate user account with minimum required privileges for that
specific purpose.
Setup NGINX
Input Y and the Ghost installation will configure NGINX for working with Ghost. While you can
manually configure Nginx for working with Ghost, the automatic configuration is recommended.
Setup SSL
You must use SSL from day 1 for your blog to ensure security. So, input Y and Ghost will
Set up SSL for your website. However, this requires that you have already configured DNS records with your domain registrar. If not, the SSL configuration will fail, but you can configure it later using the Ghost CLI command ghost setup ssl.
Setup systemd
Ghost uses systemd as the process manager. Therefore, enter Y and the installation process will
setup systemd.
Start Ghost
Finally, the installation process asks whether to start Ghost. Input Y to start Ghost and launch the
blog.
Check Ghost running status
We can check whether Ghost is up and running with the Ghost CLI command ls.
1$ ghost ls2+ sudo systemctl is-active ghost_blog-mycoolblog-com3You'll see an output like this.
Name Location Version Status URL Port Process Manager blog-mycoolblog-com /var/www/cool_blog 3.41.3 running (production) https://mycoolblog.com 2368 systemd
If it’s still in stopped status and not running, start Ghost with the CLI command start.
1$ ghost startAccessing the New Blog
If you have already configured the DNS records, you can now access the new Ghost blog with its
URL. Propagation and update of DNS records could take up a few hours, so if you have just configured
your DNS settings, it may not be possible to access the URL. In that case, you could test the
Ghost blog by using the IP address instead of the URL like https://x.x.x.x, where x.x.x.x is the
public IP address of the EC2 instance.
If things go well, you will be presented with the home page of the new Ghost blog, with some
sample posts.

Adding Content
Now that we have our blog up and running, we shall start writing the first blog post. To do that we
have to configure a username and password to log in to the blog. Go to https://yourghostdomain.com/ghost/ to set up the user account.
We are presented with the Ghost setup screen.

Click on Create User Account to configure the login details.

Fill in the required details, site title, and name, and click on the button Invite staff users.

If you are a solo writer, you need not invite anyone at this time. Just click on the I'll do this later link at the bottom and you will be taken to a dashboard.

Writing the First Ghost Blog Post
Writing with Ghost is a pleasant experience. Hover the mouse over the Posts menu item on the
left side of the screen and we get a plus icon.

Clicking on that takes us to a simple distraction-free page for writing.

Ghost has a nice feature of autosaving, so if we accidentally close the browser, click on the back
button, or refresh the page, and our content remains intact.
Let’s write our first post and publish it. As you write the article title and the body a Publish link
appears in the top right corner. We can either publish the post immediately or schedule it for later publishing.
Let’s publish a new blog post on Ghost immediately. Now we can see our post when we go to the home page of the blog.

Comments for Ghost Blog Posts
Our blog looks great but still lacks a commenting solution. Commenting is an essential part of
user engagement, so let’s integrate our blog with Hyvor Talk commenting platform, a fully-customizable, privacy-first commenting platform.
If you would also like to connect Ghost Members with Hyvor Talk, check out our full Ghost Comments with Hyvor Talk tutorial.
In three simple steps, we can make our blog ready to accept comments.
1. Sign up for Hyvor Talk
Go to Hyvor Talk, and sign up for a new user account.
2. Register your website
Once you signed in to Hyvor Talk console, you'll be redirected to Account > Add Website. Register your website thereby filling in the details of your website.
3. Add Hyvor Talk to our blog
Then, you will be directed to the Installation page, where you can get the embed code.
Switch to the folder
/var/www/cool_blog,where you have installed Ghost.Locate the template file
post.hbsaccording to the Ghost version you have installed. In our installation, it is in versions/3.41.3/content/themes/casper. In the file, find the commenter out section with the class name "post-full-comments". Remove the comments and paste the copied code from Hyvor Talk.
Earlier:
1{{!--2<section class="post-full-comments">3If you want to embed comments, this is a good place to do it!4</section>5--}}Now:
1<section class="post-full-comments"> 2 <div id="hyvor-talk-view"></div> 3 <script type="text/javascript"> 4 var HYVOR_TALK_WEBSITE = YOUR_WEBSITE_ID; 5 var HYVOR_TALK_CONFIG = { 6 url: false, 7 id: false 8 }; 9 </script>10 <script async type="text/javascript" src="//talk.hyvor.com/web-api/embed.js"></script> 11</section>Make sure that you replace YOUR_WEBSITE_ID with your actual website ID. Now, the Hyvor Talk comments section will appear under all of your posts, and your readers will be able to comment on the blog articles.
In the Hyvor Talk console, you can customize all the colors of the comments section to make it match with your website's colors.

Summing up
Ghost is a production-ready blogging platform that lets authors get started with their own blogs. In this post, we installed Ghost on an AWS EC2 instance and set up a blog under our own domain
name, then added discussions using Hyvor Talk. Ghost has more integrations such as Google Analytics, Zapier, etc.
If you have any questions, feel free to comment below.


Comments