Gated Content
After you have set up Memberships, you can use gated content to restrict access to certain content on your website to paid members.
This page explains how to use gated content using our <hyvor-talk-gated-content> component. Alternatively, you can use webhooks to sync user state (e.g.
subscription) with your system and serve gated content from your backend.
Setting Up Gated Content
Gated content is an additional feature of Memberships. If you haven't yet, set up Memberships first on your website. There are two ways to set up gated content:
- Hosted gated content: You will set up gated content blocks (HTML) in the Hyvor Talk Console and use them on your website.
- Dynamic gated content: You will set the content dynamically in an encrypted string in the component.
Hosted Gated Content
First, set up gated content blocks in Console → Tools → Gated Content.
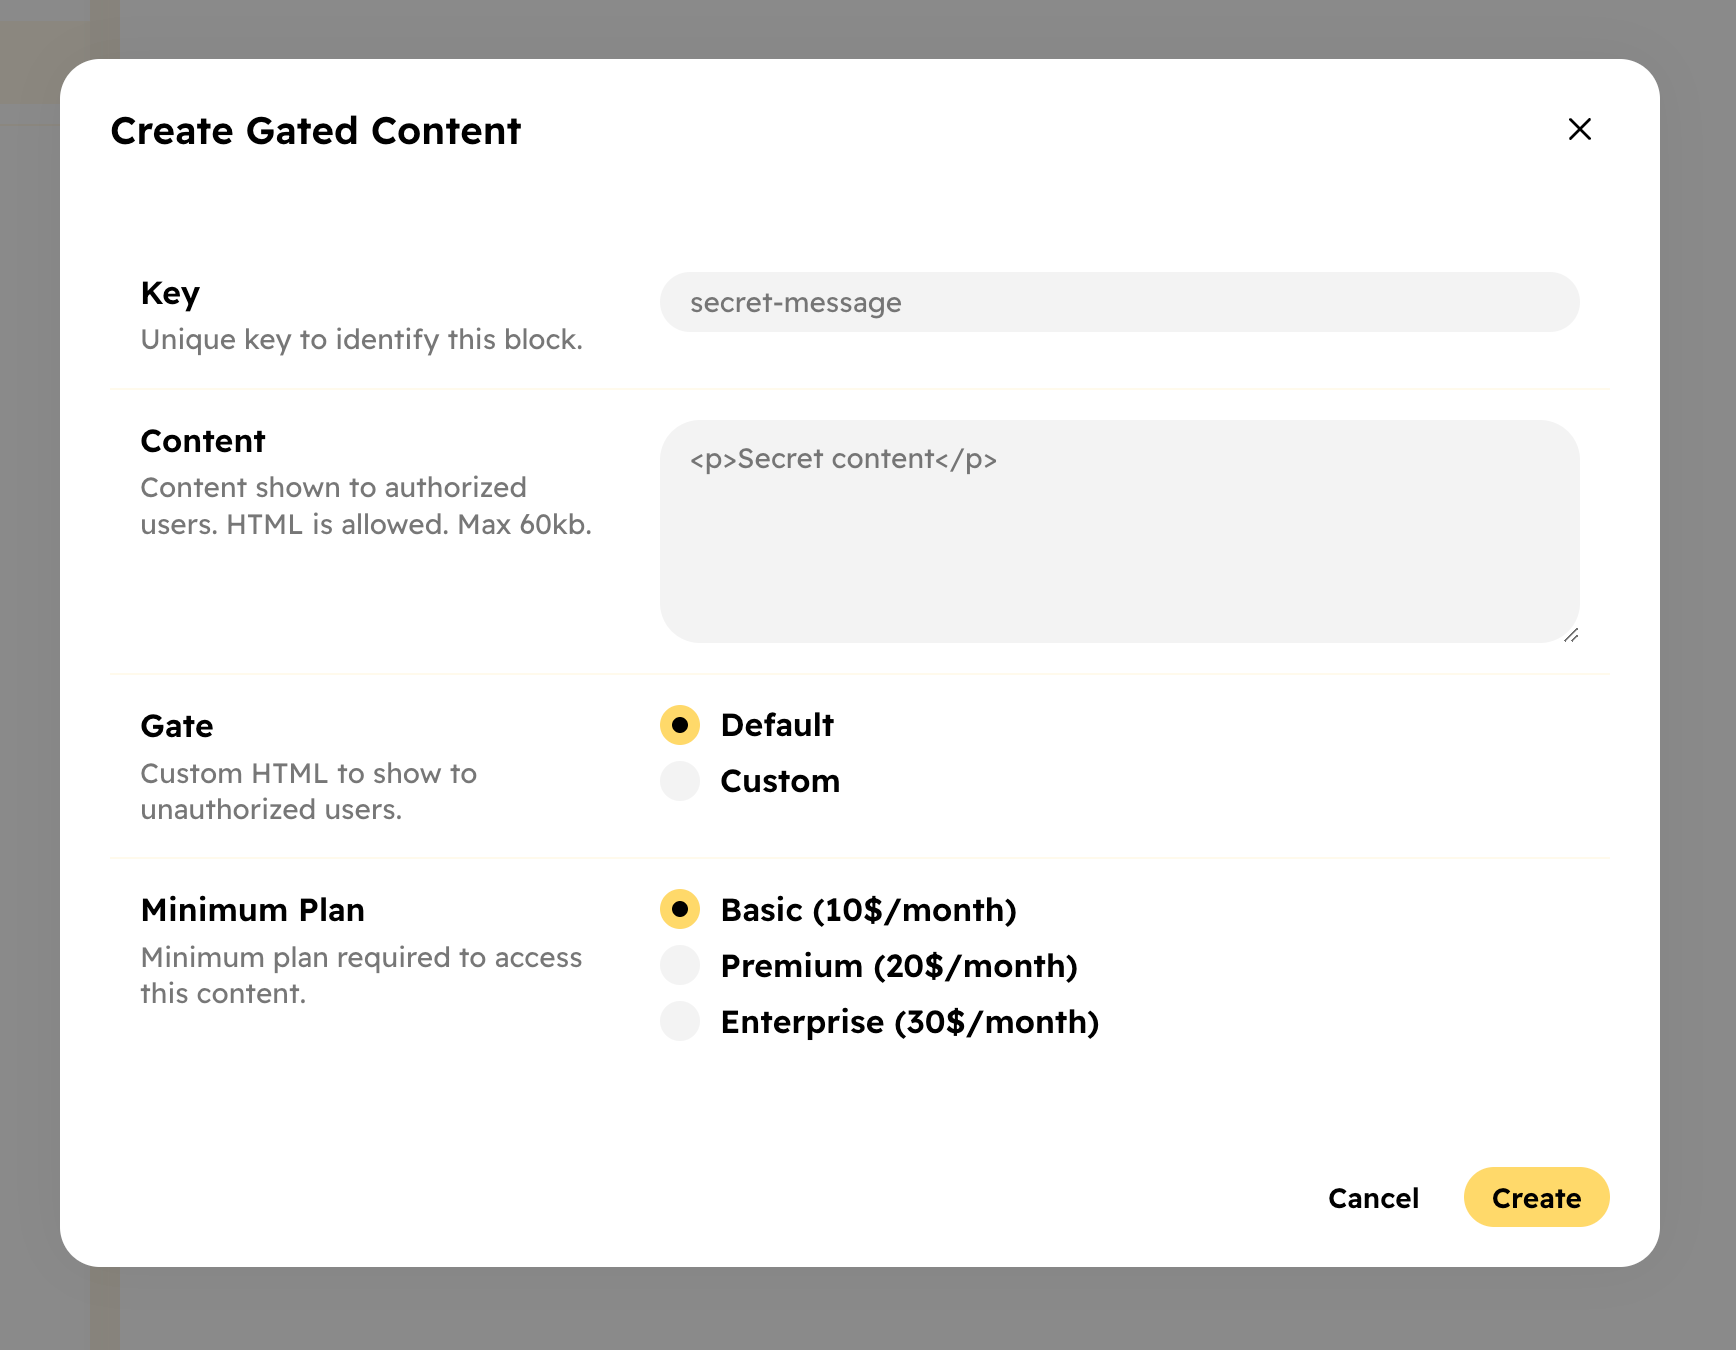
Each block has the following details:
- Key: A unique key to identify the block.
- Content: The content that you want to show to the users. You can use HTML.
- Gate: This is the content that will be shown to the users who don't have access to the content. You can use the default gate or a custom gate (HTML).
- Minimum plan: The minimum plan required to access the content.
Then, you can use the <hyvor-talk-gated-content> component to show the content.
Use the key prop to specify the key of the gated content block you want to show.
<hyvor-talk-gated-content
    key="your-key"
></hyvor-talk-gated-content>
You can create up to 1000 hosted gated content blocks per website. If you need more, please consider using dynamic gated content.
Dynamic Gated Content
Sometimes, manually setting up gated content blocks in the Hyvor Talk Console is not feasible. In such cases, you can use dynamic gated content. This requires securely encrypting a string in your backend and passing it to the component.
First, you need to set up an encryption key for your website, if you haven't already. Visit Console → Settings → API → Encryption Key to set up the key.
Below is an example in Javascript on how to generate the encrypted string. It works the same way as the Secure Attributes encryptions in the comments embed.
You can find examples for other languages in the hyvor-talk-examples repository.
// here we will use the crypto-js library
// you may use a different library that supports AES-256-CBC encryption
const CryptoJS = require("crypto-js");

// get this from Console -> Settings -> API -> Encryption Key
// do not store it in the source code (use environment variables or a secure storage)
const ENCRYPTION_KEY = "v4gaj6ELt8p5+aLuBeNbRW45BAkHQzAfC2sExq1Elr4=";

// convert the key to a format that can be used by the library
const key = CryptoJS.enc.Base64.parse(ENCRYPTION_KEY);

// this is data object that you want to encrypt
const data = {
    // Current UNIX timestamp in seconds
    // This is used to ensure that the request is not replayed
    timestamp: Math.floor(Date.now() / 1000),

    // this is the content that you want to show
    // only shown to users who have access (according to the minimum plan)
    content: "<p>Your gated content here</p>",

    // the minimum plan required to access the content
    // set the "Name" of the plan exactly as it is in the Console
    'minimum-plan': "Premium",

    // (optional)
    // this is the gate that will be shown to users who don't have access
    // if not set, the default gate will be used
    gate: "<p>Your gate content here</p>",
};

// convert the object to a JSON string
const json = JSON.stringify(data);

// Generate a random IV (Initialization Vector)
// This should be a new one for each encryption
// It is used to ensure that the same data encrypted multiple times will have different results
const iv = CryptoJS.lib.WordArray.random(16);

// Encrypt the JSON string using the key and IV
const encrypted = CryptoJS.AES.encrypt(json, key, {
    iv: iv,
});

// Finally, return the encrypted data (base64 encoded) and the IV (base64 encoded)
return encrypted.toString() + ":" + iv.toString(CryptoJS.enc.Base64);
Then, pass the encrypted string to the <hyvor-talk-gated-content> component using
the secure prop.
<hyvor-talk-gated-content
    secure="your-encrypted-string"
></hyvor-talk-gated-content>
If you are using a backend template engine like PHP, you can pass the encrypted string to the HTML directly:
<hyvor-talk-gated-content
    secure="<?php echo $encrypted ?>"
></hyvor-talk-gated-content>
Or, if you are calling an API to get the encrypted string, here is an example of how to create the component dynamically in JavaScript:
// call your backend API
fetch('https://your-api.com/encrypted-string')
    .then(response => response.json()) // assuming the response is JSON
    .then(data => {
        const encrypted = data.encrypted;

        // create the <hyvor-talk-gated-content> component
        const component = document.createElement('hyvor-talk-gated-content');
        component.setAttribute('secure', encrypted);
        document.body.appendChild(component);
    });
Loading Placeholder
It takes a few milliseconds to load gated content via our API. You may see a small content flash before the gated content is loaded. To prevent this, you can place a placeholder in the component.
<hyvor-talk-gated-content key="your-key">
    <p>Loading...</p>
</hyvor-talk-gated-content>
Default Gate
The default gate will be shown to the users who don't have access to the content unless you have set a custom gate in the Hyvor Talk Console.
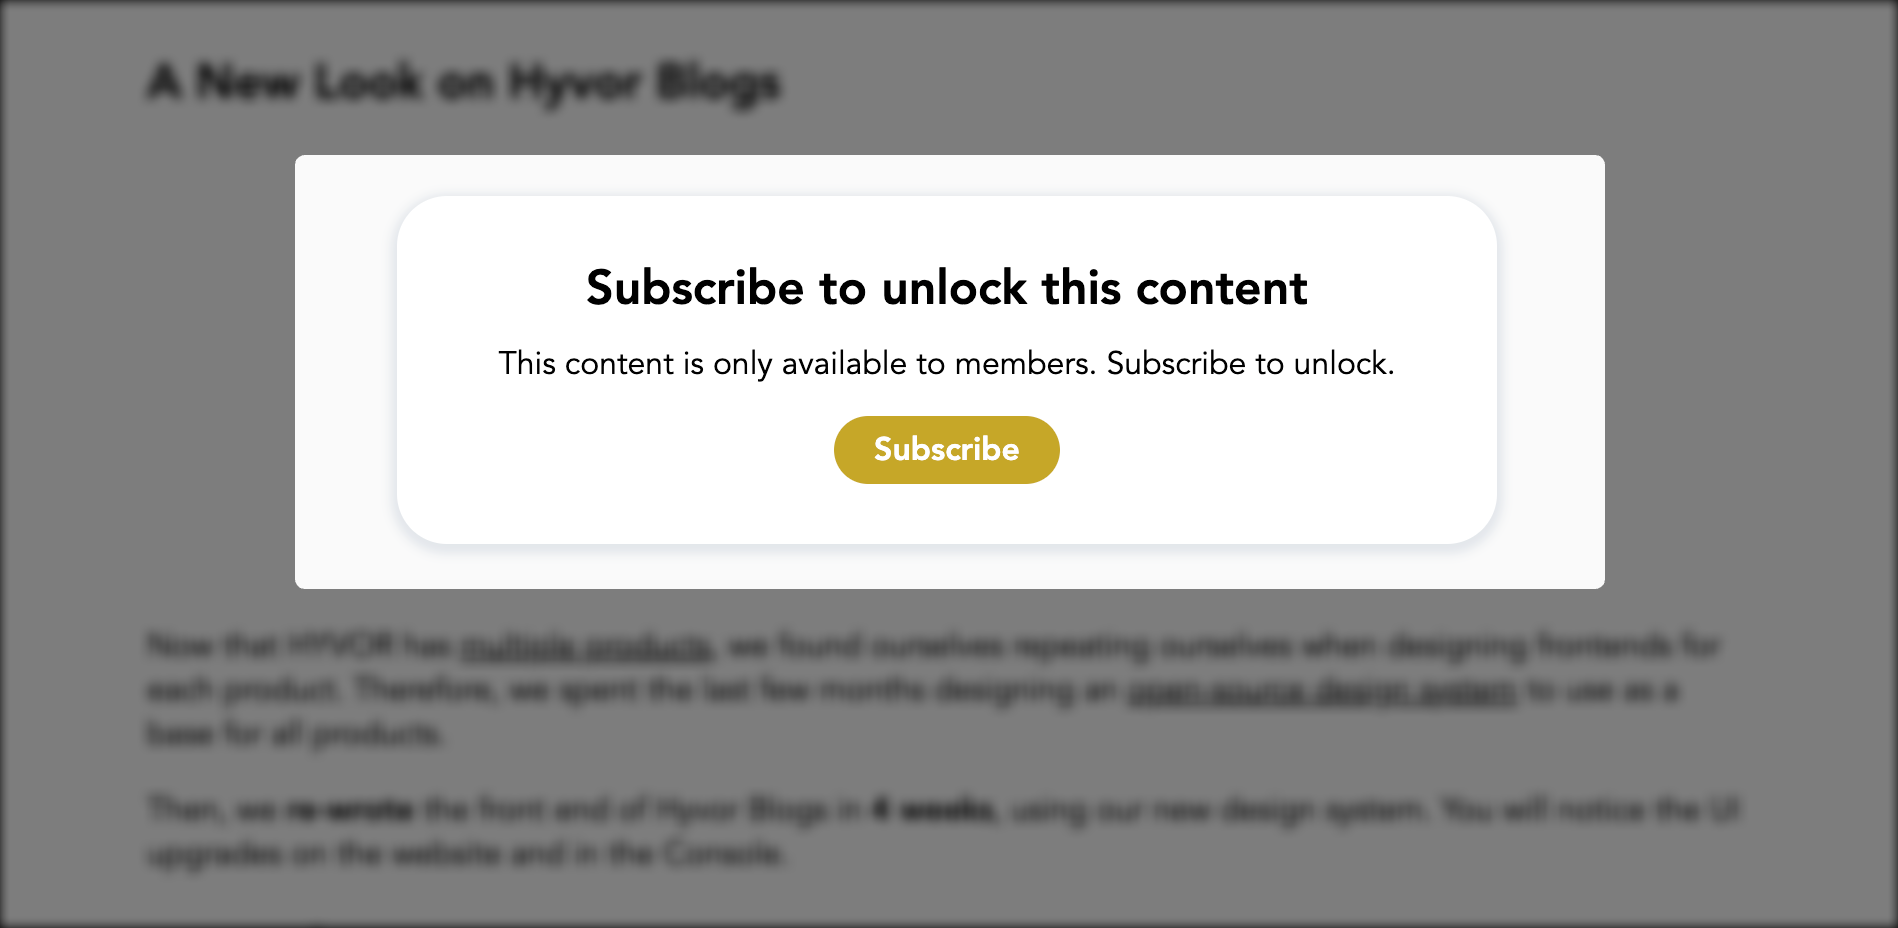
You can customize the texts of the default gate in the Console, or using the default-gate-title and default-gate-content attributes.
Gated Content Component
The <hyvor-talk-gated-content> component is used to load gated content on your website.
You can have up to 10 instances of this component on a single page.
Attributes
The <hyvor-talk-gated-content> component supports the following attributes:
Attribute
Value
keyTo load hosted gated content by key.
secureTo load dynamic gated content by an encrypted string.
default-gate-titleOverride the title of the default gate (when users don't have access).
default-gate-contentOverride the content of the default gate (when users don't have access).
Allowing Googlebot
In Membership settings, you can turn on the "Allow Googlebot" option to allow Googlebot to access gated content so that it can be indexed by Google. This is useful if you want your paywalled content to be shown in Google search results.
Careful! Hyvor Talk only handles the recognizing the Googlebot part. You need to set up structured
data on your website to tell Google that the content is behind a paywall. Otherwise, Google may
penalize your website for cloaking. See this article on Google Search Central for more information.
Finally, make sure to test if Googlebot can correctly access your gated content using the URL Inspection tool in Google Search Console.
How does Hyvor Talk recognize Googlebot?
We first check if the user agent is Googlebot. If it is, we additionally verify the IP address against Googlebot's IP addresses. If both checks pass, we allow the Googlebot to access the content.