Memberships
Memberships allow you to monetize your community by offering paid plans to your users. You can:
- Use our customizable UI to display plans and allow users to subscribe.
- Give a badge to paid users, which will be displayed in the comments.
- Add gated content to your website that only members can access.
- Use the memberships API for custom integrations.
- Use webhooks to integrate with other services, such as a CRM.
Stripe Connect
Our memberships are powered by Stripe Connect. Your paid users and subscriptions will be managed under a Stripe account that belongs to you. It allows you to own your subscriptions without depending on us. If you plan to leave Hyvor Talk, you can continue to manage your subscriptions without any interruption by disconnecting the Stripe account from Hyvor Talk.
To use memberships, you need to operate in a country where Stripe is available.
How it works
Configuration:
Go to Console → Settings → Memberships to enable Membership. You will be asked
to connect your Stripe account. Stripe will ask you to verify your identity for KYC requirements. After
the verification is completed, you can create up to 3 plans and customize the UI.
Installation:
Add the membership embed code to your website. It will
display the plans UI on your website. On the bottom right corner of your website, users will find
a "Subscribe" button, which will open the plans modal. Users can choose a plan and pay directly on your
website.
This is the minimum code required to add memberships to your website:
<script async src="https://talk.hyvor.com/embed/memberships.js" type="module"></script>
<hyvor-talk-memberships
    website-id="YOUR_WEBSITE_ID"
></hyvor-talk-memberships>
See the installation page for platform-specific instructions. See
below for the attributes supported by the <hyvor-talk-memberships> element.
Authentication:
By default, members will log into your website using a
HYVOR account (in other words, you can use HYVOR as an authentication provider). Or, you can set up SSO if you already have an authentication system in place. If the
user is already logged in for commenting, the same login will be used
for memberships (the website ID should be the same).
Plans Configuration
To configure plans, go to Console → Settings → Memberships. You will see a screen like this:
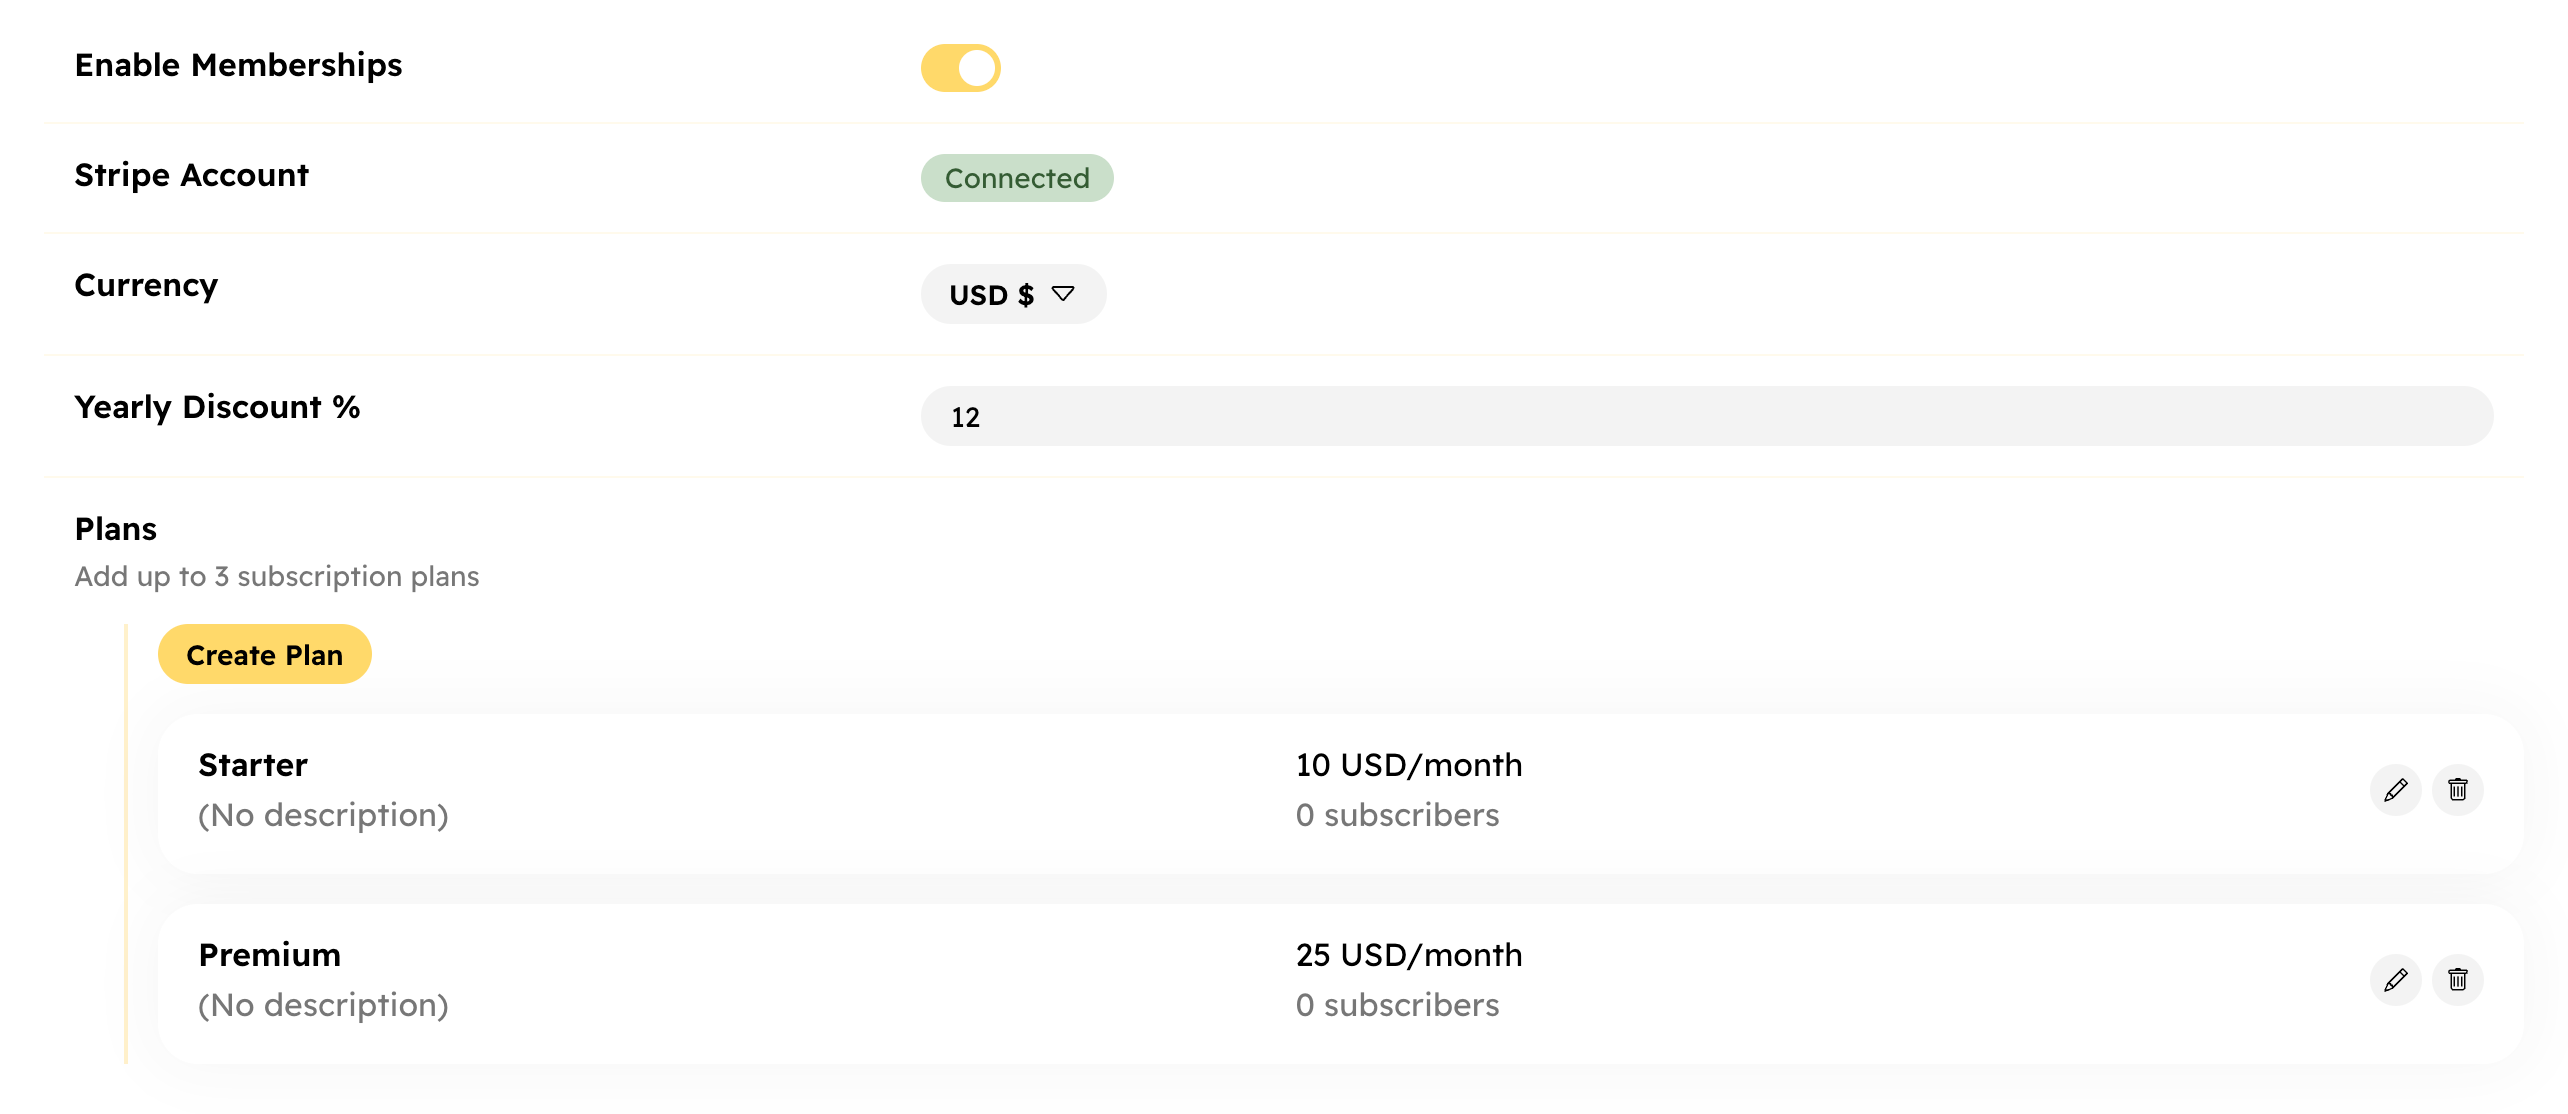
- You can create up to 3 plans.
- These currencies are supported:
- USD
- EUR
- GBP
- Each plan has:
- Name: Identifies the plan
- Description (optional)
- Monthly price
- Badge (optional): This will be shown in the comments along with the user's name
- The yearly price of each plan will be calculated based on the Yearly Discount you set.
Hyvor Talk allows you to create up to 3 plans. Each plan has a monthly price.
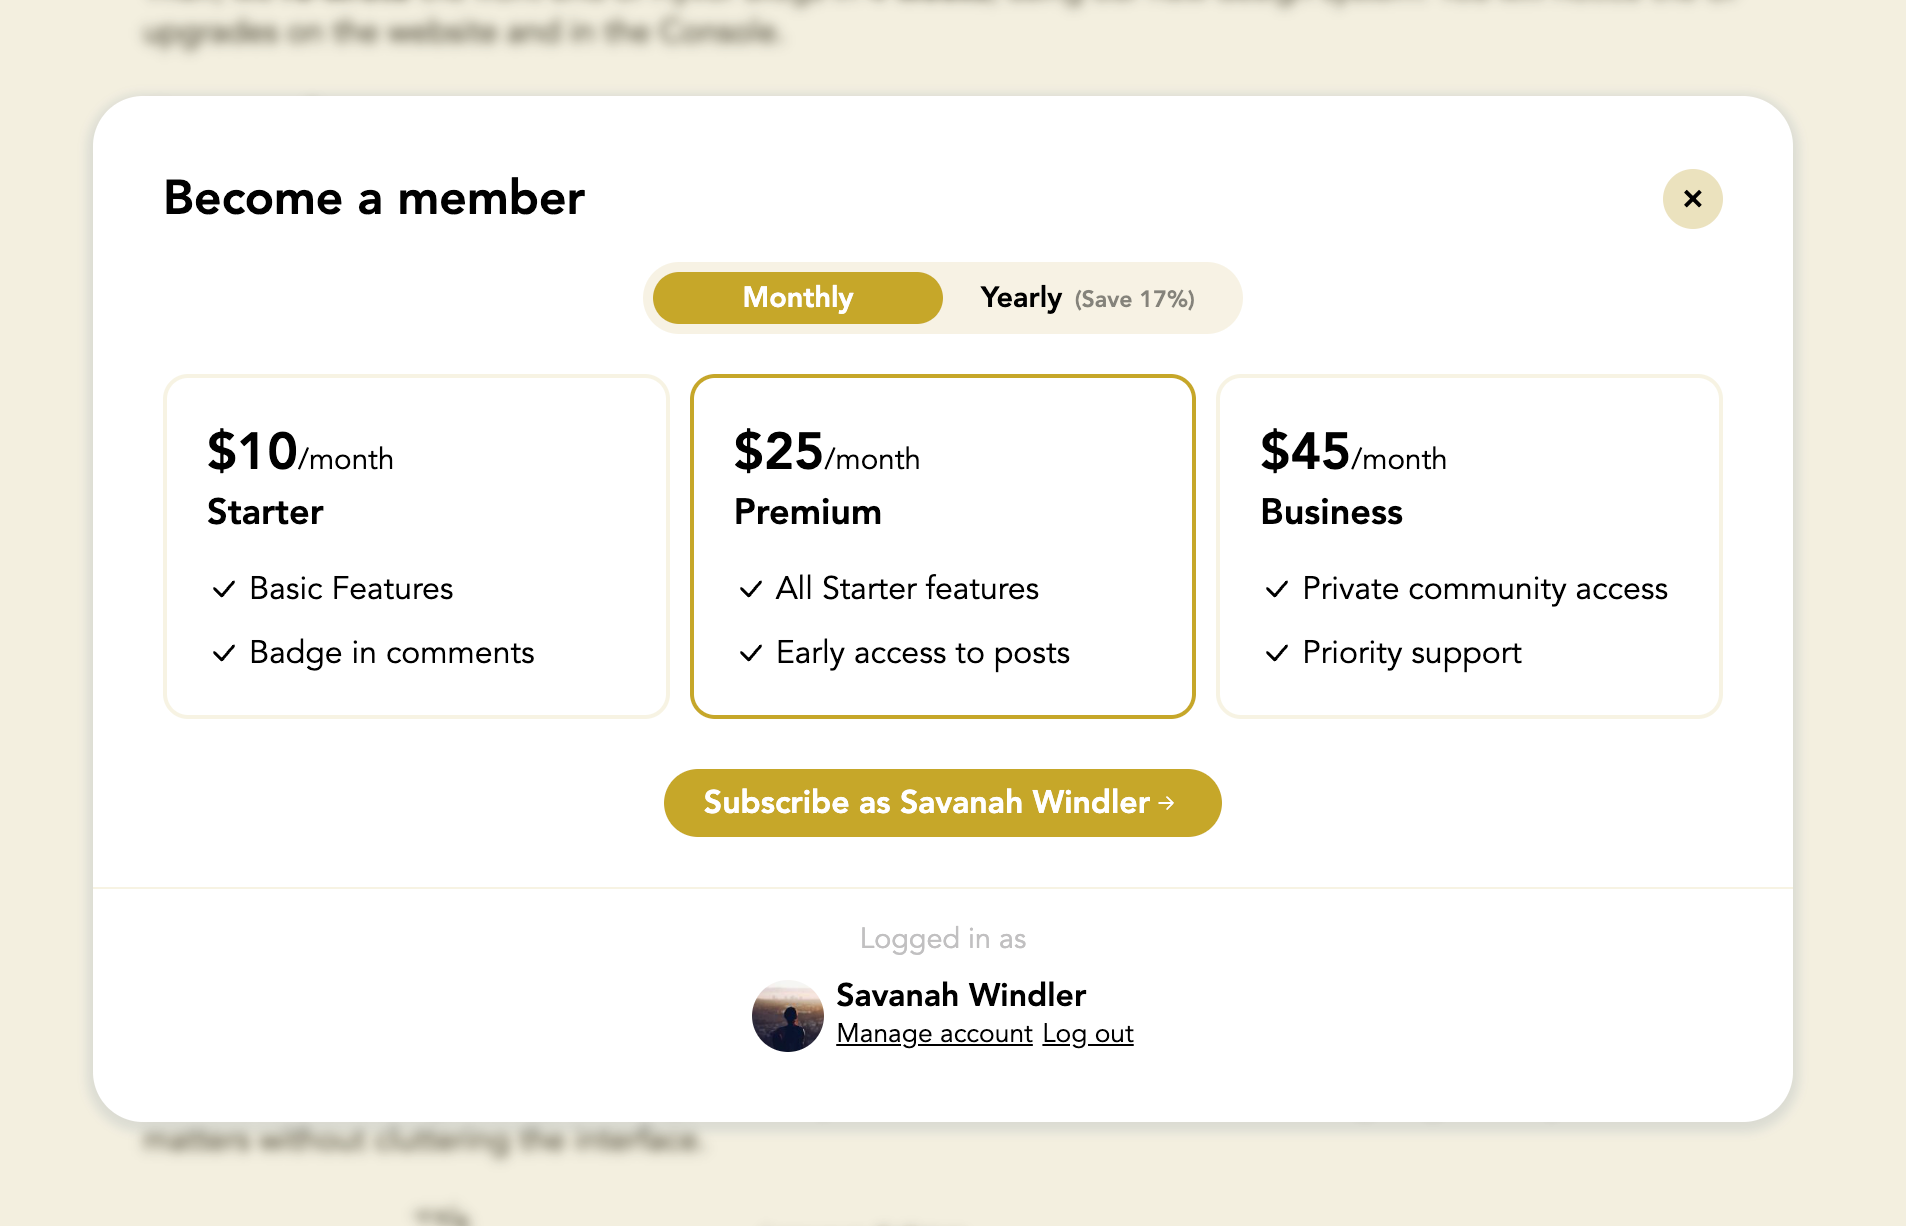
Plans UI
Plans UI refers to the user interface of the embed on your website. You can customize this at Console → Settings → Memberships. Most of the styles (colors, etc.) are taken from the Console → Settings → Appearance section.
Subscribe Button
The entry point for memberships is the "Subscribe" button. This is always displayed on the bottom right corner of your website.
Plans Modal
When the user clicks the button, a modal will be displayed with the list of plans you have created. The user can choose a plan and pay for it.
When the user is not logged in, they will be asked to log in:
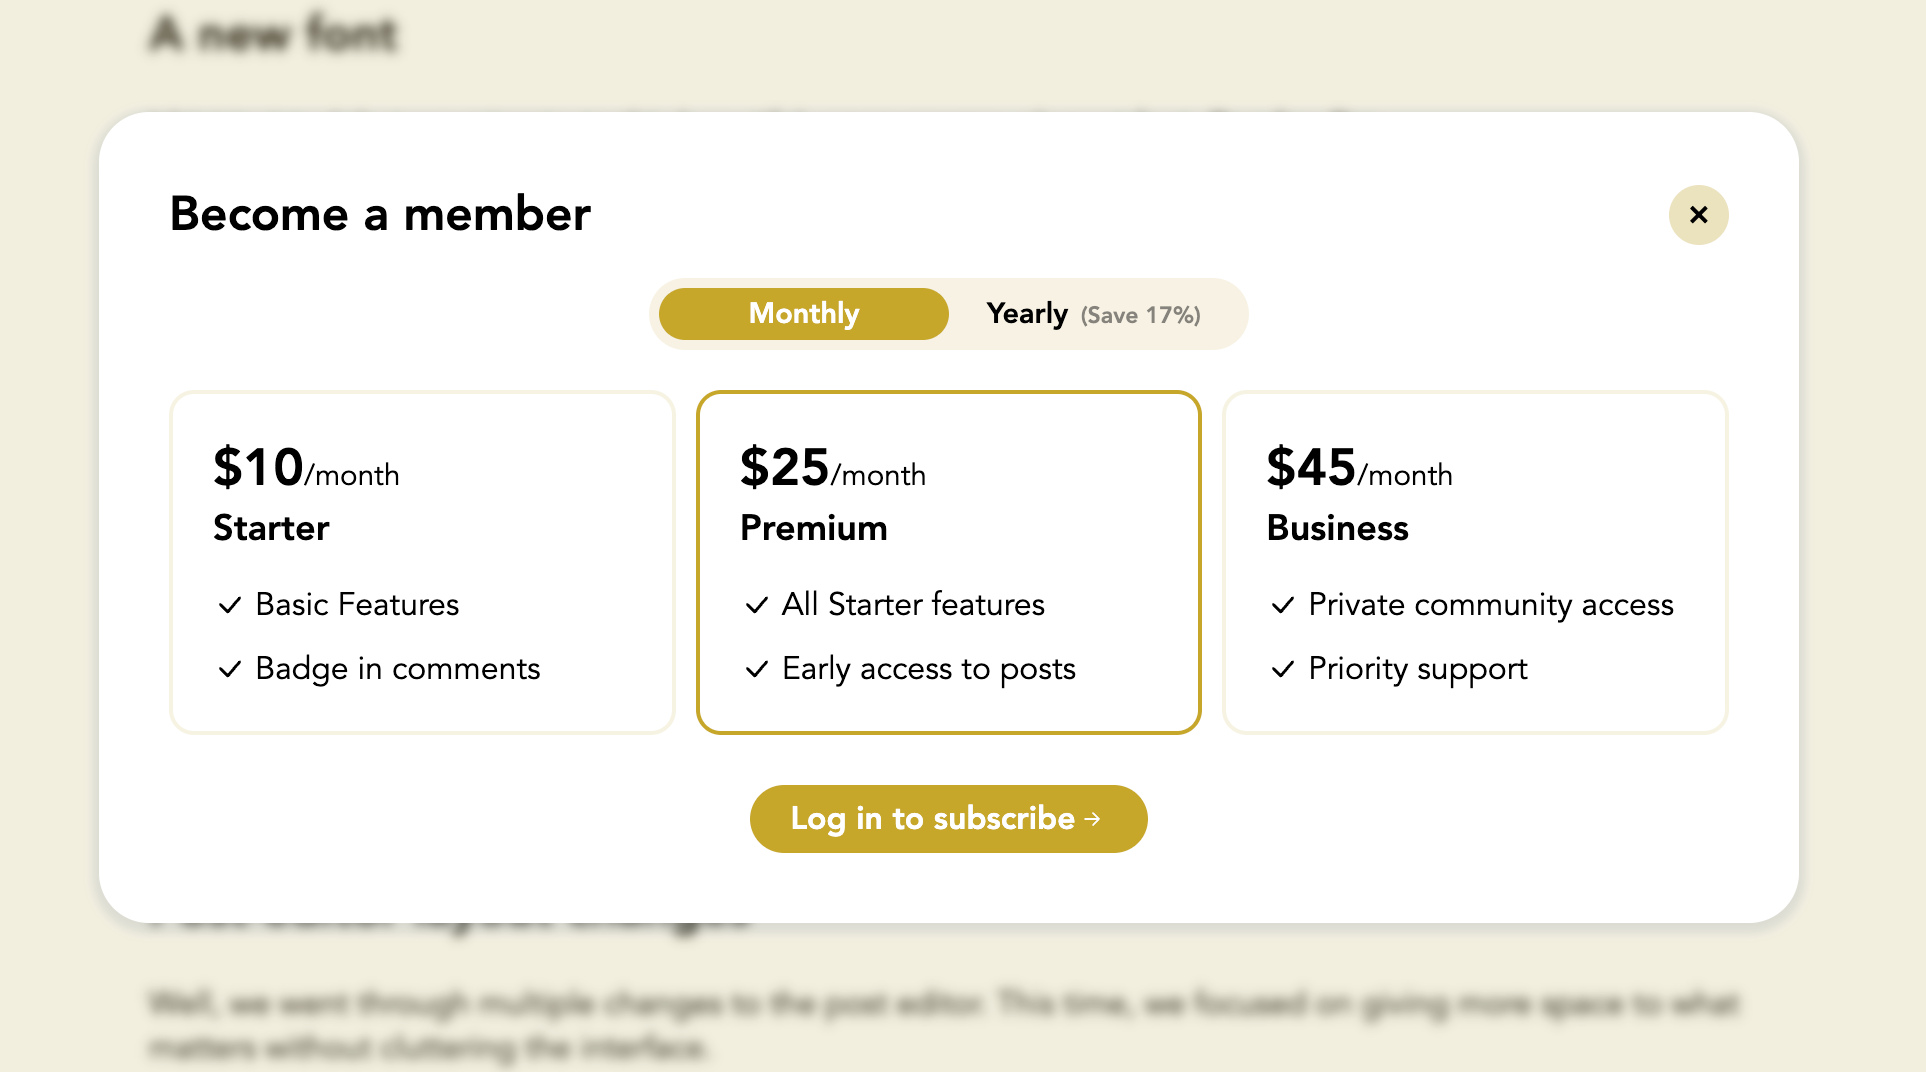
(The "Log in to subscribe" button will take the user to HYVOR or your SSO login page, depending on your settings.)
When the user is logged in, they can subscribe to the plan:
Payment
After the user selects a plan, they will be asked to enter their payment details directly on your website.
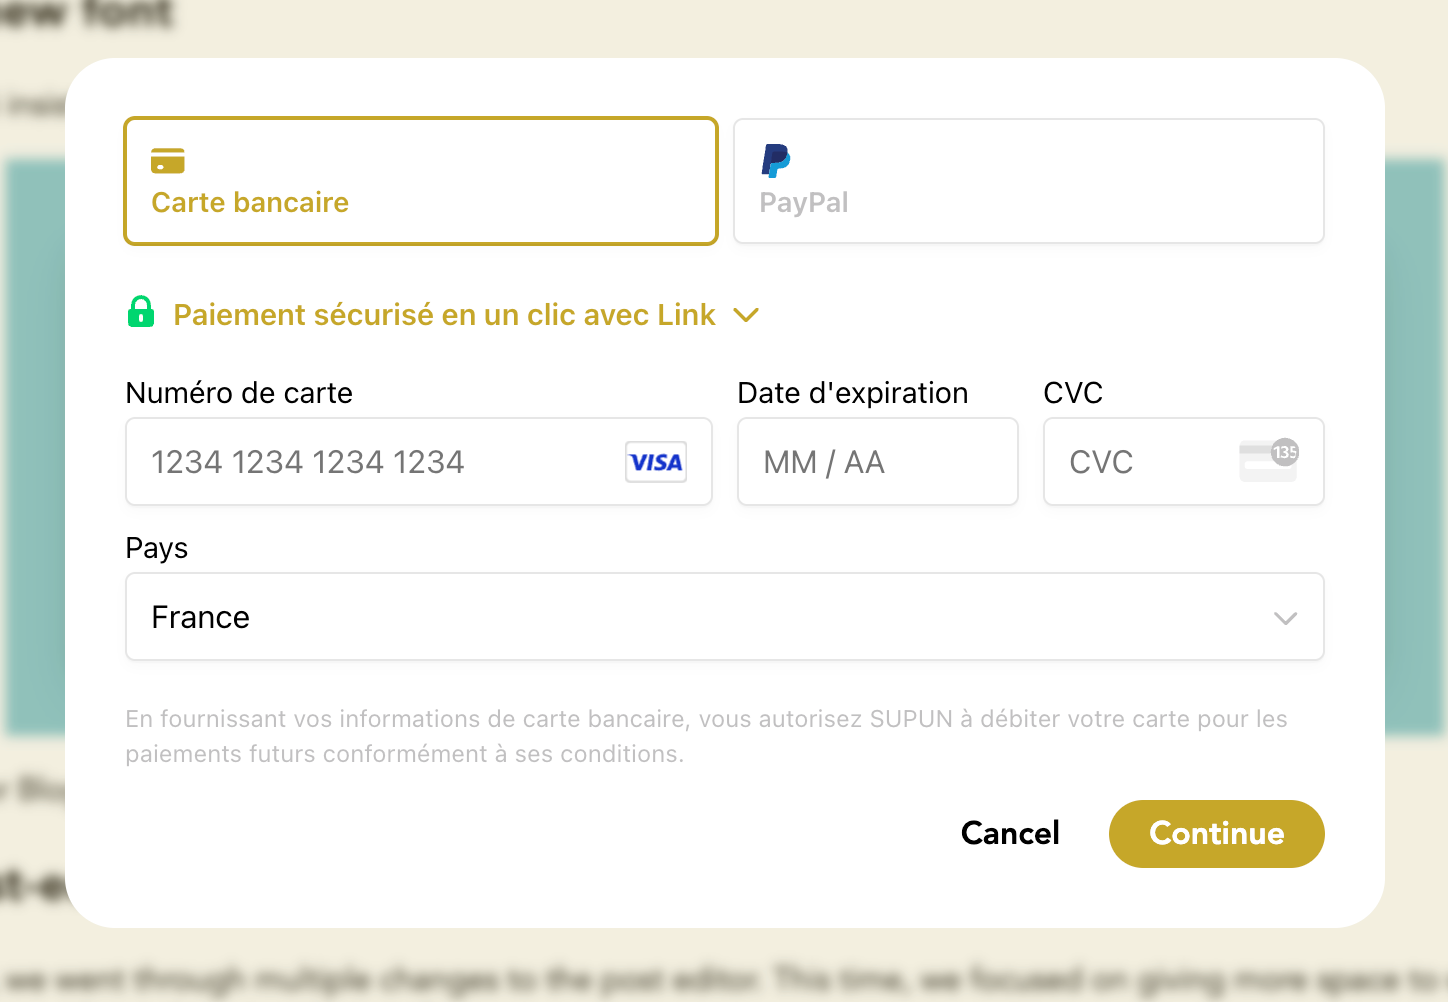
The user will be taken to an external page (e.g. their bank's website) for 3D Secure verification if required.
Payment Confirmation
Finally, the user will be redirected back to the page that initiated the payment. They will see a confirmation message, which you can customize in the Console.

You can, alternatively, set up Payment Success URL in Membership settings to redirect users to a custom page after successful payment.
Switching Plans
Users can switch between plans at any time. When they switch, the new plan will be effective immediately, and we will try to charge the user the prorated amount right away. If the payment fails, the user's subscription will be updated to past due, and we will retry the payment later.
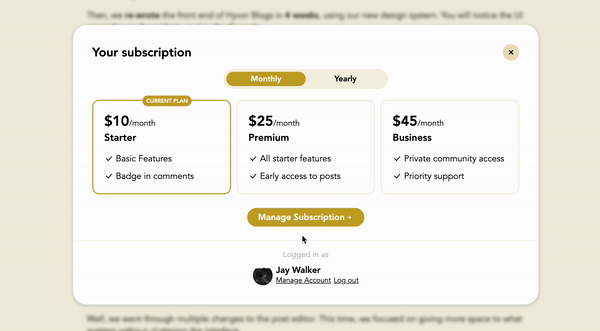
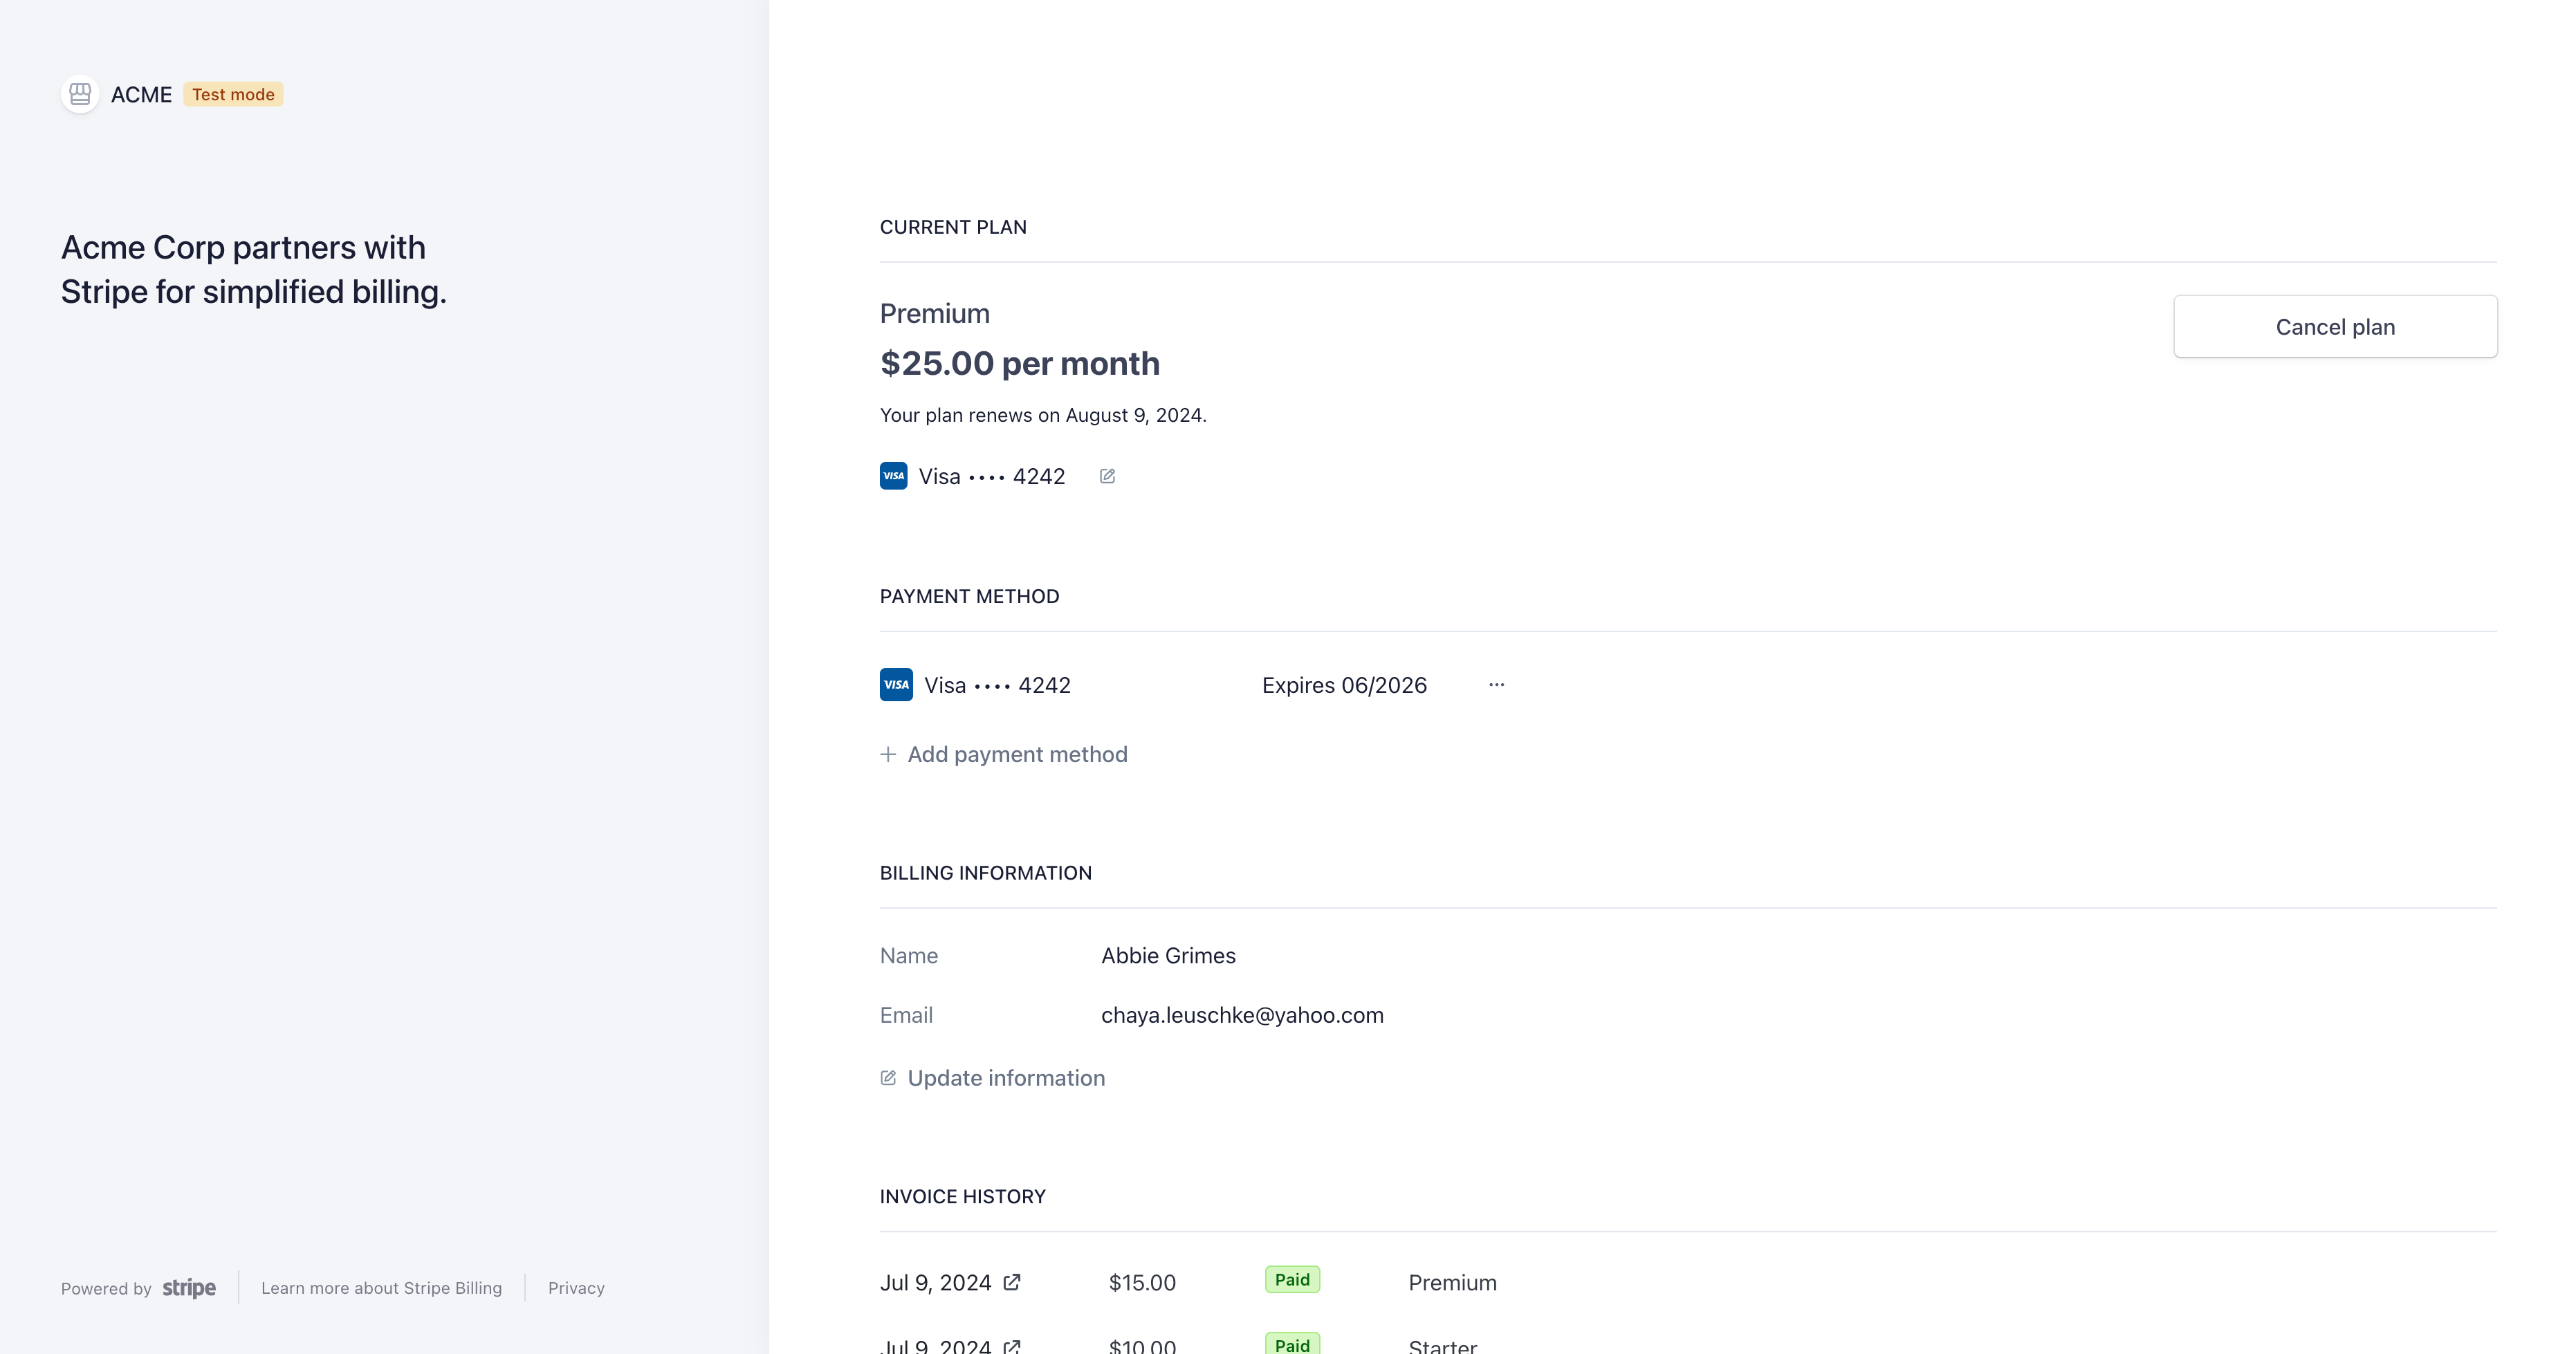
Managing the Subscription
To update payment methods or cancel the subscription, users can click the "Manage Subscription" button in the modal. This will take them to the Stripe billing dashboard.
Supported Payment Methods
Stripe supports a wide range of payment methods. To set up payment methods, go to Settings → Payments → Payment Methods in your Stripe dashboard. Out of the available payment methods, Hyvor Talk only supports payment methods that have immediate confirmation and recurring payments support.
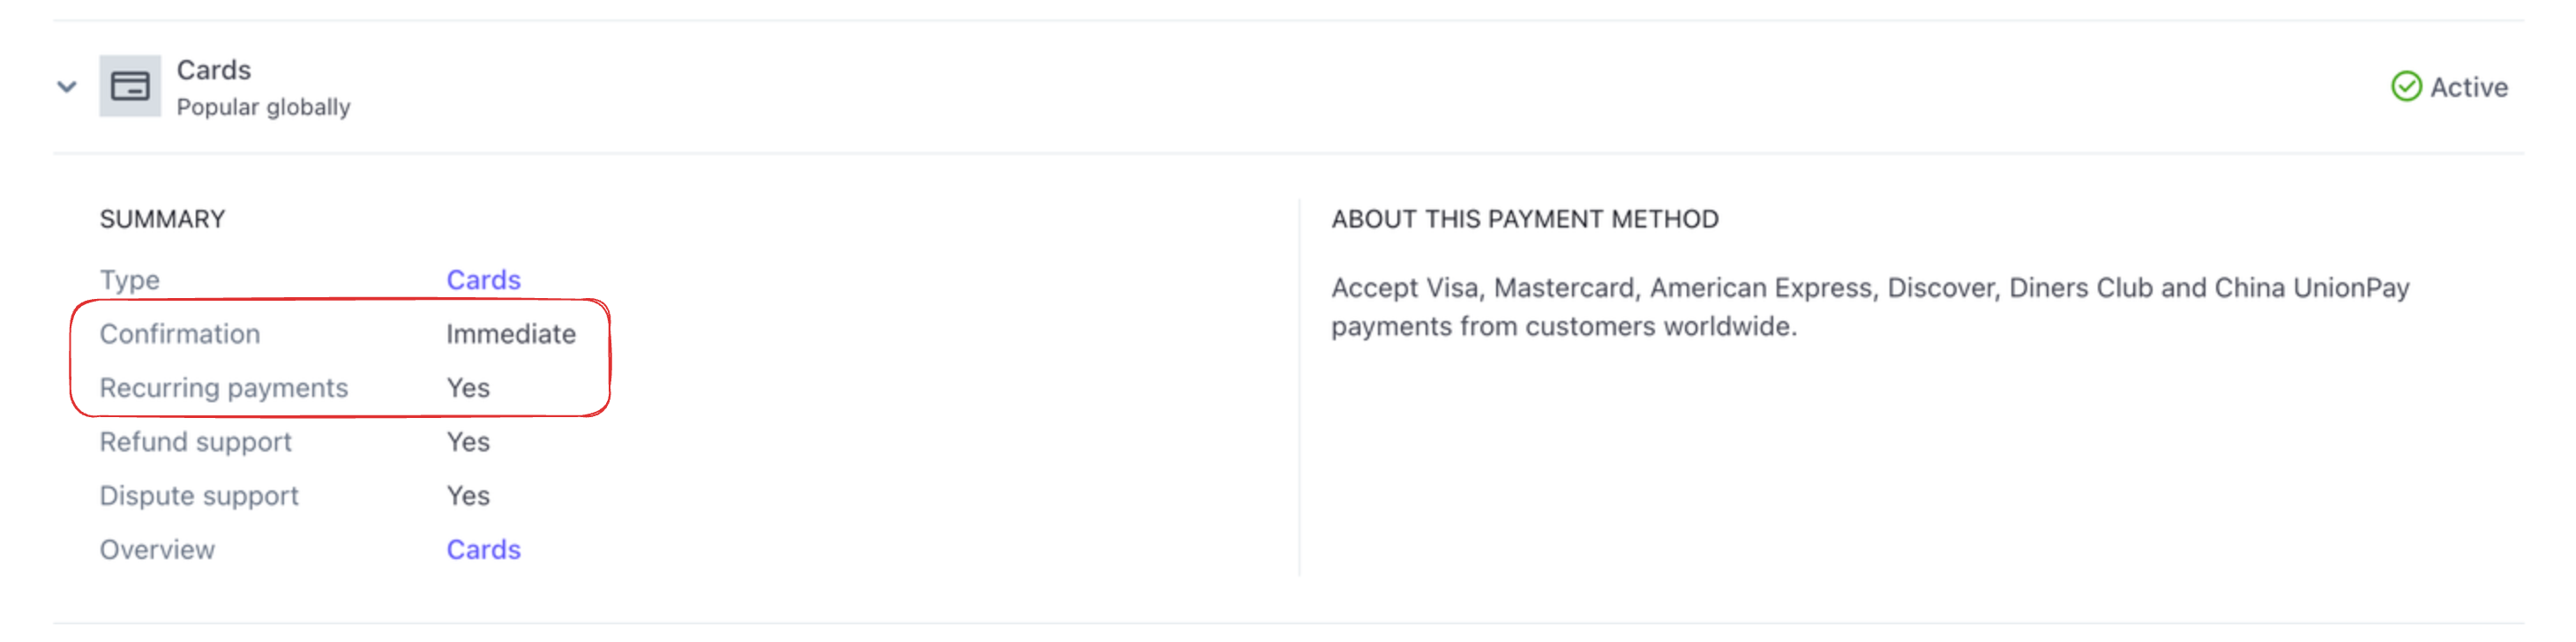
This includes:
- Cards (Visa, Mastercard, American Express, etc.)
- Carte Bancaire (France)
- Apple Pay*
- Google Pay*
- PayPal*
* Additional setup required (ex: domain verification, etc.)
Pricing
Fees
On each payment from a user, the following fees will be deducted:
- Stripe fees 1-3% (See Stripe Pricing)
- Hyvor Talk fees
- Premium plan: 5%
- Business plan: 3%
- Enterprise plan: 0%
From a €100 example charge from a European card,
- Stripe will keep €2.25 (2.25%)
- €1.50 - 1.5%
- €0.50 - 0.5%, Stripe Billing
- €0.25 - Fixed
- Hyvor Talk (in Business Plan) will keep €3.00 (3%)
- You will receive €94.75
Additionally, you will be responsible for any taxes or fees that may apply in your country.
Credits usage
Each time the <hyvor-talk-memberships> element is loaded, it will consume a credit. See pricing for more information.
Membership Component
The <hyvor-talk-memberships> element is a Web Component that provides the UI for memberships.
Attributes
The <hyvor-talk-memberships> element supports the following attributes:
Attribute
Value
website-idYour Hyvor Talk Website ID. Required.
languageThe language code of the form. Overrides your website's default.
sso-user, sso-hashSee Stateless SSO.
colorst- Attributes
It also supports the following t- attributes to override texts in the component:
t-button-subscribet-modal-titlet-modal-title-memberst-monthlyt-yearlyt-month-pert-year-pert-save-percentt-subscribe-ast-login-to-subscribet-manage-subscriptiont-switch-tot-switch-buttont-current-plant-new-plant-logged-in-ast-manage-accountt-logoutt-will-cancelt-past-duet-switchedt-default-gate-titlet-default-gate-content
<hyvor-talk-memberships
	t-button-subscribe="Join as a member"
    t-modal-title="Join our paid community"
    t-modal-title-members="You are a member!"
></hyvor-talk-memberships>
API
The <hyvor-talk-memberships> element exposes an API with the following methods:
api.auth.user()- Get the current user's data. Returnsnullif the user is not logged in, or an User object if the user is logged in.api.auth.logout()- Log out the current user.api.plans()- Get the list of plans. Return an array of Plan Objects.api.modal.open()- Open the plans modal.api.modal.close()- Close the plans modal.
API Usage
Here is an example of how to use the API:
const element = document.querySelector('hyvor-talk-memberships');
const user = element.api.auth.user();
However, the element may not be ready when the script is executed. To ensure that the element is
ready, listen for the loaded event:
const element = document.querySelector('hyvor-talk-memberships');
element.addEventListener('loaded', () => {
    const user = element.api.auth.user();
});
API Objects
User Object
interface User {
    id: number;
    type: 'hyvor' | 'sso';
    name: string;
    username: string;
    picture_url: string | null;
    bio: string | null;
    location: string | null;
    website_url: string | null;
    subscription: Subscription | null;
}
Plan Object
{
    id: number;
    name: string;
    description: string;
    monthly_price: number;
    badge_id: number | null;
}
Subscription Object
{
    id: number;
    is_yearly: boolean;
    status: 'active' | 'past_due';
    cancel_at: number | null;
    plan: Plan;
}
Events
The <hyvor-talk-memberships> element emits the following events:
loaded: when the memberships component is fully loaded.subscription:created: when a subscription is created. Payment is still pending.subscription:success: when a subscription payment is successful.subscription:updated: when the user switches to another plan.
Here's a typescript definition of the event data:
interface MembershipEvent {
	loaded: null,
	'subscription:created': {
		subscription: Subscription
	}
	'subscription:success': {
		subscription: Subscription
	}
	'subscription:updated': {
		subscription: Subscription
	}
}
To listen to an event, use the addEventListener method. e.detail will contain
the event data.
const element = document.querySelector('hyvor-talk-memberships');
element.addEventListener('subscription:success', (e) => {
	console.log('Subscription success:', e.detail);
});
Note that these events are only emitted when the user interacts with the memberships component. To handle asynchronous events (e.g. when the user cancels a subscription from the Stripe dashboard), you should not rely on these events. Instead, use webhooks.